
FELTED HAT PATTERN
by Arlene WilliamsPhotos of the hat follows the pattern.
This pattern is worked starting from the crown down to the brim instead of from the brim up. The reason I altered the pattern is that when felted, the crown on the brim-up hat has very obvious bumps which stand out. These are caused by the decreases necessary to work the crown.
By starting from the top down, you are increasing, and when felted, these lie flat. But it makes the start of the hat a little tricky, working with only 6 stitches on 4 needles.
Supplies:
- 200 gm Knitting Worsted Weight WOOL (I used old Patons "Classic Wool")
- 7.0 mm (US#11) dpn needles
- 7.0 mm 40 cm (US #11 16 inch) circular needle
- marker or loop of yarn in contrasting colour
- darning needle
NOTE: If you are not sure if the wool you have selected will felt, knit a swatch and felt it.
CROWN
With dpn's and TWO strands of wool, cast on 6 sts. Being careful not to twist stitches, join the knitting.
Row 1: Knit.
Row 2: Inc in each stitch around. (12 sts)
Rows 3, 5, 7, 9: Knit
Row 4: Increase in each stitch around. (24 sts)
Row 6: *K1, inc in next st*. Repeat around. (36 sts)
Row 8: *K2, inc in next st*. Repeat around. (48 sts)Row 10: Inc 22 sts evenly. (70 sts)
Row 11: Knit.HEAD
Change to circular needles, place a marker on the needles, and work evenly until 8 inches from the cast on stitches.
BRIM
Increase 15 stitches in the next row. (85 sts). Work evenly for 1 inch.
Increase 15 stitches in the next row. (100 sts). Work evenly for 2 inches.
Increase 15 sts in the next row. (115 sts). Work evenly until 13 inches total from the cast on stitches.
Cast off VERY loosely. If you cannot get the cast off loose enough, use larger needles. If the cast off is tight, the brim will not lie flat.
Felt in washer with hot water, little soap, and with some non-shedding dark clothes such as blue jeans (no terry towels). I kept taking the hat out and putting it into cold water to help with the felting.
When it has shrunk to the size that you want, towel dry, and put it on your head to shape it. I then lay it on a sweater dryer to keep the brim flat, but kept shaping it on my head. It took about 2 days for it to dry.

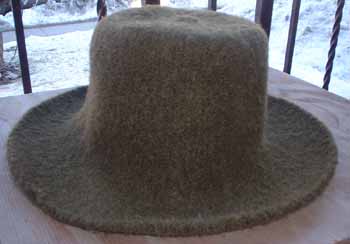

The top hat has a slightly rolled brim while the middle hat has a flat brim. Your choice. Shape the brim as it dries.
The bottom hat was made by Clare, one of my co-workers.
This pattern was developed by Arlene Williams (quanah@look.ca). You may print out a copy for yourself, and make copies for your friends as long as no money is charged INCLUDING for the cost of reproduction or materials, and as long as this copyright notice is included. You may not reproduce this pattern for sale or put it on any internet site without my express permission.

PATTERNS HOME
E-MAIL quanah@look.ca
Last updated April 8, 2006
Contents & Copy: Copyright © Arlene Williams
Web Site Design & Copy: Copyright © Quanah Web Design