
Felted Cat Basket Pattern - Two Versions
There is a photo of the cat baskets at the end of the patterns.
Felted Cat Basket Pattern - Two Versions
There is a photo of the cat baskets at the end of the patterns.
Version #1 - Original Pattern - Sandy's Cat Basket
Pitch and Putt, the cats, spend their days being chased away from yarn and knitted objects, looking for a place to curl up. This project is for them -- their very own felted cat basket. If you don't have cats, it would make a perfect container for your current sock project.
Materials
Base -- you'll be knitting a circle which I'll call a "pie". You'll be knitting one pie wedge at a time on straight needles until you complete a circle. (Remember that your cast on tail is on the OUTSIDE of the pie, not at the center -- it will help if you get confused on the first wedge.)
1. With size 11 needles, cast on 30 stitches WITH BULKY WEIGHT
2. Knit 3, turn
3. Knit 3, turn
4. Knit 6, turn
5. Knit 6, turn
6. Knit 9, turn
7. Continue to follow this progression, knitting 3 additional stitches each time before turning.
8. On the next to the last row of the wedge, you will knit 30 stitches, turn
9. Last row, slip 1 stitch, knit 29 stitches back to the outside of the pie.
10. Begin again at step 2.
11. Repeat this sequence until you have enough wedges to make a pie -- from time to time, lay your knitting out on a flat surface and check.
12. When your circle is done, bind off the last row of the last wedge. (I used almost all of two full skeins of Lamb's Pride Bulky on the base.)
13. Seam together the first and the last wedge. When you come to the end of the seam in the center, snug up the small hole. (Neatness doesn't count here - -- the felting will hide the seam.)
14. My circle was 22 inches in diameter. (If I had stopped here and felted it, I would have had a furry placemat about 15 inches in diameter after felting.)
15. With one strand of bulky yarn and a size J crochet hook loosely single crochet 106 stitches around the edge of the circle -- about every other garter stitch ridge. This made the circle cup a bit around the edges.
16. With size 13 circular needles and ONE strand of bulky and ONE strand of worsted, pick up and knit one stitch in each single crochet chain. (You could skip the single crochet step and simply pick up the stitches directly on the circle. I wanted to see how much the circle cupped and the single crochet allowed that.)
17. Join and begin knitting in the round -- alternating rows of knit and purl to create a garter stitch band. Continue to knit for 3 inches after the single crochet round.
18. On the last row, k2tog, k3, k2 tog, k3 around.
19. Bind off.
Fling the thing in the washer and felt until it is the size you like. I used the hot wash/cold rinse cycle and ran it through two 18 minute cycles.
The resulting basket came out an oval shape which I liked but I could have tugged it back into a circle. The opening measures 12" by 7" and the base measures 15" by 12" and will fit a teen-aged sized cat.
I'm letting it air dry so that it doesn't get any smaller. As it dries, the cats are circling it expecting to be chased away. When it's ready for use, I'll spray a little catnip on it and they can have at it.
To adjust for larger cats, increase the stitches in the wedges by increments of 3 -- e.g. 33, 36, 39, etc. and increase the number of picked up stitches. The mohair in this particular yarn created a very "hairy" basket
Enjoy.
Sandy Smith
Fergusfall@aol.com
This pattern was developed by Sandy Fergus (Fergusfall@aol.com). You may print out a copy for yourself, and make copies for your friends as long as no money is charged INCLUDING for the cost of reproduction or materials, and as long as this copyright notice is included. You may not reproduce this pattern for sale or put it on any internet site without my express permission.
******************************
Version #2 - Modified Version - Arlene's Cat Basket
MATERIALS
Wrap and Turn: Slip the next stitch from the left needle to the right needle as though to purl, turn, take the yarn from the front to the back, slip the first stich back from the left needle to the right needle without knitting it.
Spit-Slice: When joining wool, overlap the ends about 1-2 inches, wet them (I do this by putting them into my mouth), then rubbing the wet bit between my hands as fast as I can. This will cause the ends to felt together. You can also wet the ends with some water if the people around you get grossed out. Test the strength by pulling gently to make sure they do not come apart. This method only works on wool which is not machine washable.
1. With 8.0 mm needles, cast on 30 stitches with TWO strands of colour A.
2. Knit 3, wrap and turn.
3. Knit 3, wrap and turn
4. Knit 6, wrap and turn
5. Knit 6, wrap and turn
6. Knit 9, wrap and turn
7. Continue to follow this progression, knitting 3 additional stitches each time before turning.
8. On the next to the last row of the wedge, you will knit 30 stitches, turn.
9. Last row, slip 1 stitch, knit 29 stitches back to the outside of the pie.
10. Begin again at step 2, changing to colour B. Work steps 3 to 9 in colour B. When changing colours, just tie a knot and weave the ends in as you knit or spit-splice. Do not worry about neatness, as the felting hides plenty, plus you can cut any loose ends off after felting.
11. Begin again at step 2, changing to colour C. Work steps 3 to 9 in colour C.
Repeat this steps 2-11 until you have enough wedges to make a pie -- from time to time, lay your knitting out on a flat surface and check. I ended up with 15 "pie slices" in the three colours (5 slices each colour).
12. When your circle is done, bind off the last row of the last wedge.
13. Seam together the first and the last wedge. When you come to the end of the seam in the center, snug up the small hole. (Neatness doesn't count here - -- the felting will hide the seam.)
14. My circle was 25 inches in diameter.
15. With 12 mm circular needles and using THREE strands of wool together (one strand of each colour), pick up each garter stitch ridge around. I had 150 stitches.
16. Place a marker, join and begin knitting in the round -- alternating rows of knit and purl to create a garter stitch band. Continue to knit for a total of 4 inches.
17. On the last row, k2tog, k3, k2 tog, k3 around.
18. Bind off normal. If you bind off too loose, the side will not stand up.
Fling the thing in the washer and felt until it is the size you like. I used the hot wash/cold rinse cycle and ran it through two 18 minute cycles.
The resulting basket came out with a 17 inch circle and 3 inch sides.
The base looks like a circus tent with the alternating colours, and the three colours for the sides blended nicely after being felted, and look tweedy.
I put it into the dryer for about 5 minutes, just to get the wet out, and then laid it on a sweater rack to air dry. I kept tugging the sides up, so it would stand up.
This pattern was developed by Sandy Fergus (Fergusfall@aol.com) and modified by Arlene Williams (quanah@look.ca). You may print out a copy for yourself, and make copies for your friends as long as no money is charged INCLUDING for the cost of reproduction or materials, and as long as this copyright notice is included. You may not reproduce this pattern for sale or put it on any internet site without my express permission.
These are two baskets knit for the Williams' kitties.

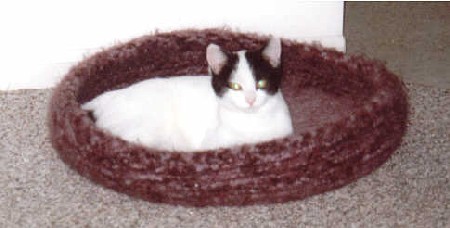
And this is Molly enjoying her cat basket, knit by her owner Cyndi who is from B.C., Canada.


| PATTERNS | HOME |